This mung bean sticky rice is a childhood favourite: this version is made within an hour with no long soaking time or steaming required! Use a rice cooker for the ultimate convenience!
Mung bean sticky rice is a household staple in my family. It’s savoury, comforting, sweet and nutty, it’s perfect for packed lunches or breakfast. Anytime my family was about to embark on a long road trip, someone (usually my grandma) made a huge batch of sticky rice for us all to eat on the road.
Whether it was this mung bean version, boiled peanut sticky rice, red sticky rice, or mung bean coated sticky rice; it was almost always topped with this sweet and savoury peanut sesame topping. My mom and I were always peanut fiends, so we’d get extra peanuts for more crunch and nutty texture.
Traditional Sticky Rice Cooking Method
I had never considered making sticky rice myself because I didn’t have the patience or the bravery to steam it in a steamer pot. Making sure the rice and beans were adequately soaked and steamed correctly was too intimidating.
My family always soaked sticky rice and partially cooked beans ahead of time, but nobody measures in my family so I had to test out the ratios myself.
When Bean was born, my mom came to stay with us for a couple weeks and helped us by making sticky rice. As I watched her make it, I would ask her how long to cook, how long to soak, how much water to use, etc. She just shrugged and said “this much”, while pointing to the pot.
This is one of the reasons why it takes me so long to develop my family’s recipes! They are all so vague in their measurements and methods, but thankfully Vietnamese YouTube is pretty vast.
After watching nearly a dozen different Vietnamese YouTube tutorials with various methods of making mung bean sticky rice, I determined the ratios and method that work for me:
No Soak, Rice Cooker method
I have a 3 cup Tiger rice cooker, which is why this recipe makes 3-4 servings. I imagine that if you had a larger rice cooker, you can double this recipe and get the same results. I’m the only one in my household who eats sticky rice so this recipe is perfect for me to make and keep in the fridge for 2-3 days.
With a rice cooker, the pressurized cooking means the soaking is not necessary. This also makes things easier and more consistent for the amount of water needed. The only thing that needs a bit of extra soaking help is the mung beans. But a quick 10 minute soak in boiled water while you prep the rest of the ingredients is easy and simple!
My rice cooker only has two modes: Cook and Keep Warm. After research and various tests, I’ve found it necessary to wait 15-20 min after the rice cooker has finished cooking. Otherwise you may need to hit “cook” again, but this leads to scorching of the bottom layer of rice.
The lingering steam from the initial cooking process will help fully cook through the rice and beans, yielding the correct texture for sticky rice.
PLEASE use a kitchen scale for this recipe. I have not tested this with volume. I have not tested this recipe with other types of rice cookers with other modes
No Soak + Rice Cooker Mung Bean Sticky Rice – Xôi đậu xanh
Ingredients
Sticky Rice
- 100 g yellow mung beans + boiling water for soaking
- 250 g sweet glutinous rice short or long grain, I’ve used both, my mom prefers short grain
- 300-315 mL water
- 1 tbsp 7.5 g canola oil
- 1/2 tsp 1.6 g salt
- Optional: 4-5 pandan leaves bruised then tied into a knot
Peanut Sesame topping:
- 1/2 cup roasted red skin peanuts peeled and lightly crushed
- 1/4 cup toasted sesame seeds
- 3 tbsp sugar
- 1/4 tsp salt optional
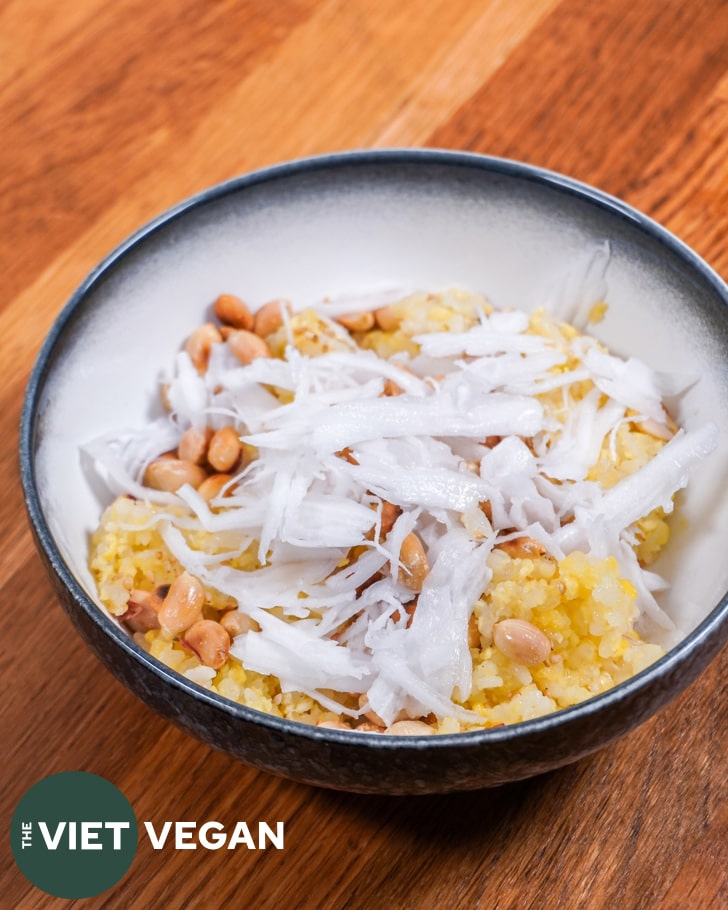
Sticky Rice Topping
- Peanut sesame topping
- Fresh coconut meat
- Fried shallots
Instructions
- In a heat-safe container, soak mung beans in boiling water for 10 minutes. Mix the beans into the water well so they don't clump when you add the water.
- Meanwhile, rinse your sweet rice well until the water runs clear (this should take 2-3 rinses)
- Drain your soaked mung beans over a mesh strainer with your sweet rice and drain well. I like to mix the two ingredients in the strainer to drain out as much water as I can.
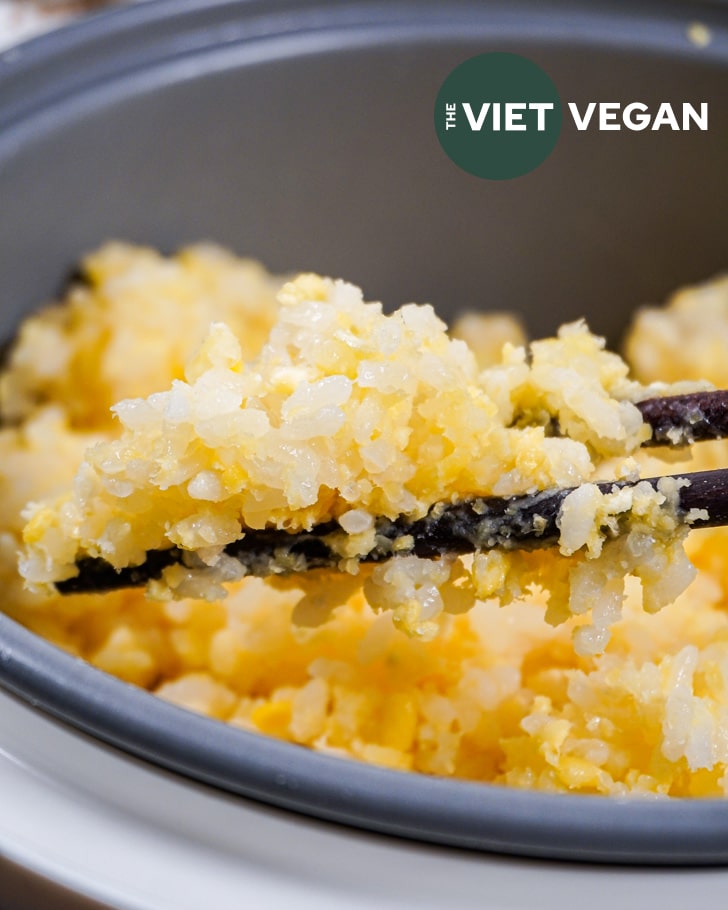
- Transfer to a rice cooker, and add canola oil and salt, and mix well until evenly incorporated. Gently level the mixture, giving everything some space to expand (aka, don't press down the mixture).
- Add 300-315 mL water (do 300 if you want it drier and fluffier, 315 mL if you like your sticky rice stickier and softer). Level again and add a pandan leaf knot (if using) on top. Be sure to muddle/bruise the pandan leaves before adding to the pot to get more flavour.
- Then turn on your rice cooker! I have a rice cooker that is automatic and has one setting. Once the rice cooker flicks from "Cook" to "keep warm", DO NOT OPEN the rice cooker. Let it steam and cook through for another 15-20 minutes before opening the lid.
- Meanwhile, make the peanut sesame topping by combining roasted red skin peanuts, toasted sesame seeds, sugar and salt. This topping makes more than enough for 3 servings. Feel free to adjust the salt amount as desired (or omit completely since I added salt to the sticky rice cooking process already)
- Once 15-20 min has elapsed, fluff the sticky rice with chopsticks.
- Top with the peanut sesame topping, fresh coconut meat and fried shallots! I didn't have any left by the time I had finished testing this recipe, but the fried shallots are a must!


Nicole Doorn says
Do you use peeled Mung beans?
Lisa Le says
yes!
Anam says
Ngon quá! Cảm ơn chị for this easy recipe. I never thought I’d have the time to make this at home. It was delicious!
Monique says
Can’t wait to try this! Do you reheat or eat cold on subsequent days?
Lisa Le says
Reheat! I usually use the microwave
Hiroshi says
It worked out well, but I needed more water likely because I soaked it overnight and it expanded more than yours? It wasn’t too dry or too wet and I filled to line 3, used brown sticky rice on the mixed mode on my pressure rice cooker, and let it sit the extra 20 minutes in there. I used mung beans peeled but also with the skins and it tastes fine. Thank you for the recipe. :)
Julia says
I’m so excited to try this and not have make it on the stove! Does your rice cooker steam or pressure cook? Roughly how long does the “cook” function take with this recipe? I have a multi-cooker with a pressure cook option and a steam option (I usually pressure cook my rice so it’s only under pressure for a few minutes).
Lisa Le says
It’s like a combination of steam and pressure? You could try pressure cook but maybe reduce the water a tiny bit since it’s not steaming out like in a rice cooker.